Using Microsofts new tool, Photosynth, I created a very nice panorama of Mount Rainier, the tallest mountain in the Cascade Range.
Mt. Rainier Photosynth Panorama
Wednesday, December 17, 2008
Thursday, July 24, 2008
Lift the Fog Off Your Photos
Lift the Fog Off Your Photos
Using Adobe Photoshop's Black and White Point Adjustments
By Diane Miller
July 14, 2008| In my last tutorial, "Introduction to Levels, Part 2," I said a black and white point adjustment is the first thing that should be done with most images. I'll show you how to do it here. Setting the black and white points in Adobe Photoshop involves finding the darkest and lightest points that are short of pure white or pure black and pushing them to just short of black and white. It will also neutralize any color cast in those values. This will maximize contrast and will often give an image a major pop. But it can be too heavy-handed for some images, and if so you can back off either the black or white setting, or both. And doing a black and white point isn't appropriate for low-contrast images that shouldn't have tones close to blacks or whites, such as gray winter trees in fog. You have probably been doing an approximation to a black and white point adjustment by hand, by moving the end points in Levels (or Curves), dragging each end slider until it is just touching the end point of the histogram. But there is an easier and more accurate way. Here is an image I shot in the shade, which is low contrast and has some color cast problems. First we need to find the darkest and lightest areas in the image. Click the Adjustment Layer icon (circled in red) and choose Threshold, as shown below.  You will get a black and white version of the image with a slider at the 50 percent point.  Drag the slider beneath the histogram to the left until only the last remnants of black remain. This shows the darkest areas of the image. Then bring the cursor into the image window and it will change into an eyedropper. (If it or other tools show as a crosshair, your Caps Lock key may be on; it toggles the cursor to a crosshair. If that isn't the problem, go to Photoshop > Preferences (Windows: Edit > Preferences) and go to Cursors. Set Painting Cursors to Normal Brush Tip and Other Cursors to Standard.) Now hold the Shift key and the eyedropper changes to the Color Sampler tool, which is found in the Toolbox in the same box as the Ruler tool. Then click one of the darkest areas that is not completely black, which will drop a sample point there. You may want to mark two different spots. You can zoom in on the image to place the point more precisely but extreme precision isn't necessary. You will zoom in to do the actual correction and in most cases you only need the marker to get close.  Then drag the Threshold slider to the right until it shows the lightest areas and place points on one or two of them. (You can only place 4 points on an image.) Don't choose a specular highlight such as a very bright reflection off metal; it is already a white point. You want areas that are just below white, with the first trace of detail, which includes both texture and color.  With the sample points in place you can dismiss the Threshold adjustment with the Cancel button. If you have already hit OK just delete the layer. If the sample points disappear don't worry; they will appear again in the next step. Now make a Levels adjustment layer. We will be using the eyedroppers there, and you should click on the Eyedropper tool in the toolbox and look at the options bar at the top of the screen to check the sample point size. For most uses 5x5 pixels is a good size, but in some cases you may want a different number. The default sample of 1x1 is not good if there is any noise. You will sample just one pixel and each one may vary too much from the surrounding ones. It's better to average several. In a noisy area with little detail you may even want 11x11. In the Levels dialog box, if you have not done it before you need to change some default values. Double-click on the black dropper and in the next dialog box that comes up, labeled Select target shadow color, you want to set the R, G, and B values to slightly higher ones. Suggestions range from 3, 3, 3 to 5, 5, 5. Leave all the other values alone. Then do the same for the white dropper, setting each of the RGB values about 250-252. You want to do this because you are going to click on a point that is not pure black or white, but just short of them. You want an area that has the first hint of detail so you can neutralize color casts in these almost-black and almost-white tones. If you left the values at 0's and 255's you would push those values to pure black or white. Now zoom in so you can see details around one of the points. Usually a 50 percent zoom is good but if the area is very detailed you may need to go higher. You would like to see enough of the image to evaluate the tonal changes you're about to make, but more importantly, you need to see the detail around the point so you can click the correct area accurately. In the Levels dialog we can click on the white or black eyedropper (circled in the figure below), whichever one corresponds to the point we're looking at. Here I have zoomed in to the two white point markers in the highlights along the top part of the sign.  Click the dropper on what appears to be one of the lightest areas. Try several clicks at different points until you get one that gives changes you like. You want one that makes a subtle correction to any color cast but doesn't blow out the whites. If you click an area that is too far below white you'll blow out all the tones that are lighter. In some cases you'll find the white point was already OK and you don't need to change anything, but it can be hard to know that until you try. When you're satisfied click OK. Then double click on the layer name and rename it "White Point." If you get the Layer Style dialog box you didn't hit the name itself. The tip of the finger pointer needs to be exactly on the layer name. Then zoom back out to see the whole image to be sure you like what you did. Toggle the visibility of the Levels layer on and off to see the changes. If you're not satisfied, you can re-open the Levels dialog by double clicking its adjustment thumbnail (just to the right of its eyeball in the Layers palette.) Then try sampling other areas with the dropper. Then do the same for the darkest areas. You can re-open the Levels dialog and set the black point using the same adjustment layer but it's a better idea to make another layer. Click the New Adjustment Layer icon at the bottom of the Layers palette and choose Levels again. A new Levels layer appears on top of the first one. Repeat the same process as above, choosing the black eyedropper and again trying several points until you get a result you like. Usually the point with the minimal change is the best. A point whose value is too far away from black will block up the dark areas, pushing near-blacks to black. That is not good.  Here is the image with both points set, compared to the original. If either adjustment is too heavy-handed you can reduce the strength by making sure that layer is active and using the Opacity slider in the top right of the Layers palette. But this will weaken the color correction. If the midtones of the image become too dark you can lighten them by moving the middle slider in the main Levels dialog a little to the left. (You can see that slider in the figure just above; it is the one in the middle of the histogram, just above the box that has 1.00 in it.) Here are the before and after images. You can see what a dramatic difference this simple adjustment made. No other adjustments were made. You should zoom into the darkest and lightest areas and make sure areas that should be very dark were not blocked up to black (which give them a gritty-edged appearance) and areas that should be very light were not blown out to pure white.  Sometimes a black or white point adjustment won't change the image noticeably, or will make it worse. That's fine; that just means you had good black or white points to start with. Just delete any unnecessary adjustment layer. Setting the black and white points will remove color casts in the shadows and highlights. This will often be enough to neutralize any color cast in the image, but occasionally a cast will remain in the midtones. I'll show you how to fix that in another tutorial. Diane Miller is a widely exhibited freelance photographer who lives north of San Francisco, in the Wine Country, and specializes in fine-art nature photography. Her work, which can be found on her web site, has been published and exhibited throughout the Pacific Northwest. Many of her images are represented for stock by www.MonsoonImages.com and Photolibrary. |
Thursday, July 3, 2008
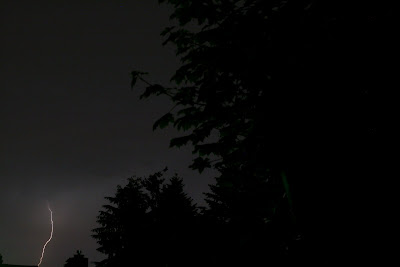
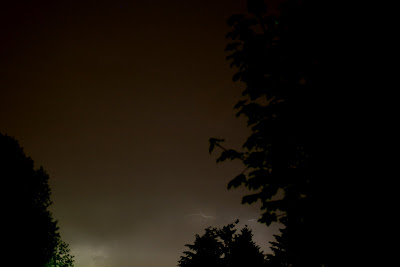
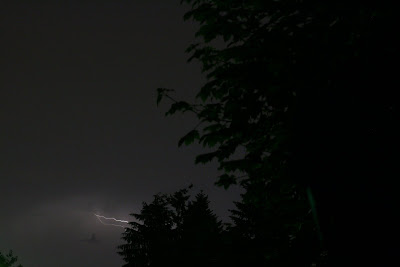
Thunder And
Last night we had a fairly lengthy lightning storm in Seattle. I pulled out my camera and got a few time lapse shots of the lightning. Unfortunately my field of view was a bit limited but I caught several strikes.
Monday, May 19, 2008
B-17 Visit to Seattle
EAA B-17 Bomber Visit to Seattle, WA (May 21, 2008 10am - 5pm)
I saw this B-17 (Aluminum Overcast in 398th B.G colors) flying over Puget Sound out my office window today and took a couple photos. It is being hosted at the Museum of Flight for Memorial Day weekend. It was a treat for a WWII collector to see a little flying history.
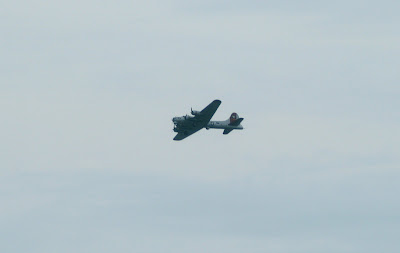
See this post at World War II History blog for the plane details and its visit to the Museum of Flight.
Technorati Tags: B-17, Seattle, Museum of Flight, WWII, WWarII
I saw this B-17 (Aluminum Overcast in 398th B.G colors) flying over Puget Sound out my office window today and took a couple photos. It is being hosted at the Museum of Flight for Memorial Day weekend. It was a treat for a WWII collector to see a little flying history.
See this post at World War II History blog for the plane details and its visit to the Museum of Flight.
Technorati Tags: B-17, Seattle, Museum of Flight, WWII, WWarII
Tuesday, April 29, 2008


Monday, April 21, 2008
Black, Blue & Moon
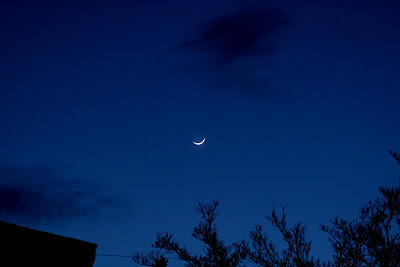
The blue in this evening moon shot is so rich with the black tree and house in the foreground.
Photography Articles and Reviews
Hello All and Welcome!
Here is a good resource of photography articles and camera reviews. I have pulled several posts out of a few articles in here. Feel free to read and post at your leisure.
Photography Articles, Reviews, and More
Here is a good resource of photography articles and camera reviews. I have pulled several posts out of a few articles in here. Feel free to read and post at your leisure.
Photography Articles, Reviews, and More
Tuesday, April 8, 2008
10 Photo Tips: In-Flight Photography
10 Photo Tips: In-Flight Photography
I think one of my favorite things to do in taking photos is to take them out the window of airplanes while on trips. You can get some wonderful shots of the sky, sun, ground, cities during the day and the moon and lights at night.
Here are a few tips to get some great shots out of those rare flights.
Tip #1 - Preparation
Reserve your seat in advance. Get the window seat. People tend not to like you leaning over them to get up against the window to take pictures. Also, try to be in front of the wing if at all possible. This will extend your photo range and reduce any air disturbances from the jet wash.
Tip #2 - Preparation
Have your camera out or easily available to you. If you have a small case for your DSLR or full size camera, think about taking that instead of a full case. It will fit under your seat easier and if needed pack extras in your main luggage.
Tip #3 - Preparation
Bring a small cloth, or napkin with you. Clean off the window as much as possible so you can reduce the spots (they usually aren't very clean). Also, turn out all the overhead lighting and/or bring a coat or jacket with you that you can use as a light shield to reduce any glare of the window.
Tip #4 - Photo Ops
Unfortunately, an airplane isn't standing still in the air. Remember to use a higher speed setting to reduce blur. (On my Canon Rebel XTi I generally use Tv 1/200 on ISO 800 or 1600). I generally stick with the shorter 18-55mm lens. A telephoto lens is difficult to handle in a small space, and is much harder to get stabilized, focused, and un-blurred shots.
Tip #5 - Photo Ops
Take-offs are great opportunities for photos of cities and closer to ground images. Have your camera ready to go for just after the plane takes off. (You can get some fun shots of airplanes while taxiing, and get your settings adjusted).
Tip #6 - Photo Ops
Just after take-off, if it is a cloudy day, wait for the airplane to break through the cloud layer. If its a morning or evening flight you can usually get some really good sunrise or sunset photos.
Tip #7 - Photo Ops
Take lots of photos or use the continuous shot feature on your camera. Most shots are close to a once in a lifetime opportunity that you wont be able to replicate later. (This is easier with digital cameras, just delete them later when you're on the ground.) You will have a better chance to get a clean shot when you can pick the best of 3 (or 5).
Tip #8 - Night Photo Ops
Night and dark photos are especially tricky. More so when you add in movement and vibration. It definitely helps if you have a steady hand (no room for a tripod, but a small monopod might help.) Play with extending your exposure time and lower the ISO to 100 or 200, if not lower. If your photo is a little dark, remember you can probably lighten it up in Photoshop later. This will help to get smaller details cleaner.
Tip #9 - Night Photo Ops
Night shots can be very rewarding. Sunsets can create beautiful vibrant colors and lighting features that you can capture. The moon as well can cast an immense amount of light on clouds if it's after sunset. The moon and stars are even brighter when flying at 30,000' as you are above a lot of atmosphere that you would normally have to shoot through. Big cities are great at night with all the lights.
Tip #10 - Safety
Taking photographs in a commercial airline is a very cramped business. Try not to bother the person sitting next to you (maybe even let them look outside once in a while). Be careful with your equipment, there isn't a lot of room available for storage under the seat in front of you (don't kick the camera). If you are taking pictures out the window, remember turbulence can happen. Don't let your camera hit the window, or your face, if a sudden jolt hits (leave your body semi-loose and flexible - be a human shock absorber).
Remember, have fun with your shots. I certainly don't get to fly enough and I like to take every opportunity I can when I do to get great photos.
Some of my flight shots:
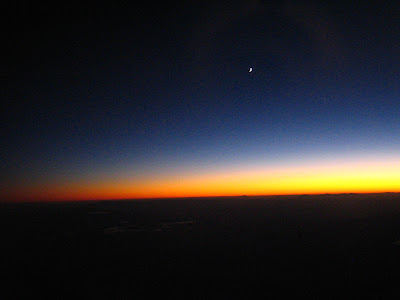
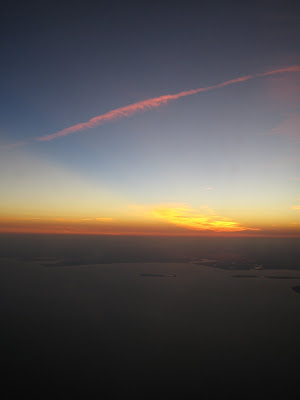
Day-Night Border over Cascade Mountains
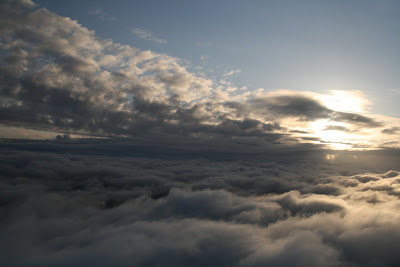
Sunrise over Seattle

Sunrise over Seattle Weather
Fire Night (One of my favorites)

Moon Over Hole
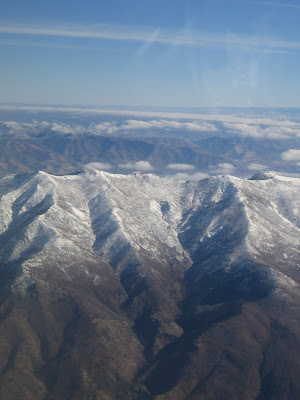
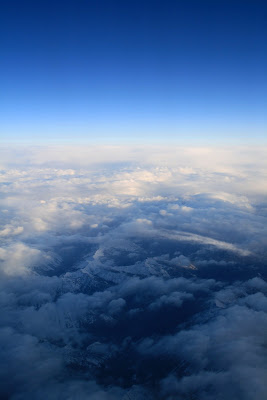
Rocky Mountains, Montana
Sunset over Houston, TX
I think one of my favorite things to do in taking photos is to take them out the window of airplanes while on trips. You can get some wonderful shots of the sky, sun, ground, cities during the day and the moon and lights at night.
Here are a few tips to get some great shots out of those rare flights.
Tip #1 - Preparation
Reserve your seat in advance. Get the window seat. People tend not to like you leaning over them to get up against the window to take pictures. Also, try to be in front of the wing if at all possible. This will extend your photo range and reduce any air disturbances from the jet wash.
Tip #2 - Preparation
Have your camera out or easily available to you. If you have a small case for your DSLR or full size camera, think about taking that instead of a full case. It will fit under your seat easier and if needed pack extras in your main luggage.
Tip #3 - Preparation
Bring a small cloth, or napkin with you. Clean off the window as much as possible so you can reduce the spots (they usually aren't very clean). Also, turn out all the overhead lighting and/or bring a coat or jacket with you that you can use as a light shield to reduce any glare of the window.
Tip #4 - Photo Ops
Unfortunately, an airplane isn't standing still in the air. Remember to use a higher speed setting to reduce blur. (On my Canon Rebel XTi I generally use Tv 1/200 on ISO 800 or 1600). I generally stick with the shorter 18-55mm lens. A telephoto lens is difficult to handle in a small space, and is much harder to get stabilized, focused, and un-blurred shots.
Tip #5 - Photo Ops
Take-offs are great opportunities for photos of cities and closer to ground images. Have your camera ready to go for just after the plane takes off. (You can get some fun shots of airplanes while taxiing, and get your settings adjusted).
Tip #6 - Photo Ops
Just after take-off, if it is a cloudy day, wait for the airplane to break through the cloud layer. If its a morning or evening flight you can usually get some really good sunrise or sunset photos.
Tip #7 - Photo Ops
Take lots of photos or use the continuous shot feature on your camera. Most shots are close to a once in a lifetime opportunity that you wont be able to replicate later. (This is easier with digital cameras, just delete them later when you're on the ground.) You will have a better chance to get a clean shot when you can pick the best of 3 (or 5).
Tip #8 - Night Photo Ops
Night and dark photos are especially tricky. More so when you add in movement and vibration. It definitely helps if you have a steady hand (no room for a tripod, but a small monopod might help.) Play with extending your exposure time and lower the ISO to 100 or 200, if not lower. If your photo is a little dark, remember you can probably lighten it up in Photoshop later. This will help to get smaller details cleaner.
Tip #9 - Night Photo Ops
Night shots can be very rewarding. Sunsets can create beautiful vibrant colors and lighting features that you can capture. The moon as well can cast an immense amount of light on clouds if it's after sunset. The moon and stars are even brighter when flying at 30,000' as you are above a lot of atmosphere that you would normally have to shoot through. Big cities are great at night with all the lights.
Tip #10 - Safety
Taking photographs in a commercial airline is a very cramped business. Try not to bother the person sitting next to you (maybe even let them look outside once in a while). Be careful with your equipment, there isn't a lot of room available for storage under the seat in front of you (don't kick the camera). If you are taking pictures out the window, remember turbulence can happen. Don't let your camera hit the window, or your face, if a sudden jolt hits (leave your body semi-loose and flexible - be a human shock absorber).
Remember, have fun with your shots. I certainly don't get to fly enough and I like to take every opportunity I can when I do to get great photos.
Some of my flight shots:
Day-Night Border over Cascade Mountains
Sunrise over Seattle
Sunrise over Seattle Weather
Fire Night (One of my favorites)
Moon Over Hole
Rocky Mountains, Montana
Sunset over Houston, TX
Tuesday, March 25, 2008
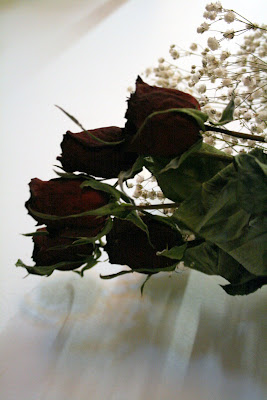
Dry Roses & Crystal Shadow
Here is an application of the previous post about how to take pictures of flowers.
This is a photo of some dried Valentine's roses but the twist is their shadow is diffused because the light source is coming from a reflection off crystal.
This is a photo of some dried Valentine's roses but the twist is their shadow is diffused because the light source is coming from a reflection off crystal.
Monday, March 17, 2008
How to Photograph Flowers
HOW TO PHOTOGRAPH FLOWERS
When you photograph flowers, you have to make a couple of important decisions.
As with any photograph, your first decision is to decide: What's my subject? Is it a bouquet of flowers, or the macro view of a stamen? A single flower closeup? A bed of hundreds of flowers? A field of thousands?
From this decision will flow many specifics of the picture you want to take and how to go about it.
Macros - Let's start with the macro photo — that is, with extreme closeups. Of course, you can only take this type of picture if your lens has a macro mode. This rules out most film point-and-shoot cameras that can't focus closer than two or three feet. With a macro, you're focusing from a few inches!
When you take a macro photo, focus is all-important. Your plane of focus is very shallow — just a fraction of an inch. So you have to make another decision: Exactly what part of the flower do you want to be in sharp focus? The pistil? The stamen? A petal? (We've run out of high-school biology terminology, but you get the idea.) Unless you're a botanist, you will probably make this decision "on the fly" — that is, as you look through the viewfinder. When you see the image that you want, press the shutter!
While it is possible to take a good close-up photo handheld, our advice is to use a tripod if at all possible. Particularly if the flower is swaying in the wind, changing the focal point every moment, you're better off not adding the additional confusion of a swaying camera too. Use a tripod and be patient. Most often, the wind will die down from time to time and the flower will stand still and "pose" for an instant. That's the instant to shoot!
Tip - Windy conditions? Try using a sheet of cardboard to protect your target from the wind. Becareful of it's effect on lighting conditions however.
Shot of a Single Flower Head - Much of what we said for the macro view applies here too. As before, you can't get close enough for this type of picture with film point-and-shoot cameras. Once again, you'll be better off using a tripod if possible. Remember also that you don’t have to make pictures of single flowers while you’re bent over in the garden. Over the years many great photographers have made wonderful still life studies of flowers in a studio setting where there’s no wind and the photographer has precise control over the lighting. Whether you’re taking pictures indoors or out, once again exposure will be more precise if you use a gray card or take an incident reading. And the picture will often be improved if you can add a crawling critter.
Good focus is still important, but it's not so critical as it was with the macro. The zone of good focus is now a few inches, not just a fraction of an inch. So, while you still want to focus well, you don't need to watch focus quite so critically.
An added decision for you to make with this type of shot is to consider the direction of light. It's possible to take a very attractive picture with the light in its "usual" position, streaming from behind you toward the flower. But give strong consideration to backlighting — that is — light coming from behind the flower, toward the camera. Since flower petals are usually translucent, backlighting can give them an iridescent glow that accentuates the flower's color and brings it to life.
Bigger Floral Subjects - What about a bed of flowers...or a field of them? Here, you can probably use a point-and-shoot as well as an SLR. A tripod is less necessary. Focus is no longer critical — it can extend for feet or even miles. And metering with your built-in meter will probably produce a good result.
What about the direction of light? It still can make a difference. If you can check how the flowers look from different sides, by all means do so. Frontlighting may be all right. Backlighting — or sidelighting — may be better. Camera angle — that is, height — is usually less important in this type of long shot. (You should still stoop down to see if the image is improved from a low angle that will accentuate the nearest flowers.)
What should you look out for here? We think you should go back to the very first decision: What's your subject? A bed or field of flowers may look exquisite to your eye, but often makes an awfully dull picture. Look for something that will add interest to the picture. Something else that will draw the eye of the viewer and be the subject of your picture, with the flowers acting as swatches of color that complement it.
If you're photographing a flower bed, look around. Perhaps, a child playing amidst the flowers will make a far more interesting picture. Or the house behind it. Or the apple tree in the foreground? Or the fence in the background. Or anything else you can find to draw the viewer's eye and add interest.
Do the same with a field of flowers. Is there a barn that would make a better subject? A tree? A windmill? A lone person far out in the field. A babbling stream? A majestic mountain landscape?
To sum all this up: Flowers are colorful and can make beautiful subjects when you're close up and they fill the frame. You're better off finding another subject, and using the flowers as an "accessory," when you're shooting from farther away.
- Summary and Excerpts from the New York Institute of Photograph, HOW TO PHOTOGRAPH FLOWERS - PART 1 article
Thursday, March 13, 2008
Out to Lunch
As often I get to use my camera, I don't have enough time in the day to manage my photos or post new ones to my photography blog. I have been working on other projects that have taken up the majority of my time, like my World War II History site and WWII History blog.
This has basically eaten up all my photoshopping and posting time. However I have been collecting historical WWII photos and images into a database, so my photo work goes on, even if slightly redirected by about -60 years.
This has basically eaten up all my photoshopping and posting time. However I have been collecting historical WWII photos and images into a database, so my photo work goes on, even if slightly redirected by about -60 years.
Out the Window
Being stuck in the office all day has its advantages and its disadvantages. Fortunately I have a wonderful wall of windows on the other side of my desk that overlooks the Seattle waterfront and Puget Sound. I can watch the ferries make their runs every day.
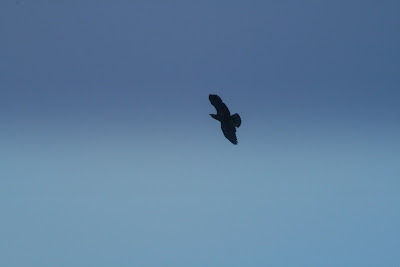
In the last couple weeks there has been an increasing number of eagles flying around and over the water. I have been able to get a couple shots of them flying over with my 75-200 telephoto lens on my Canon Rebel XTi.
Here is a shot of a Golden Eagle flying over the Edgewater Inn.
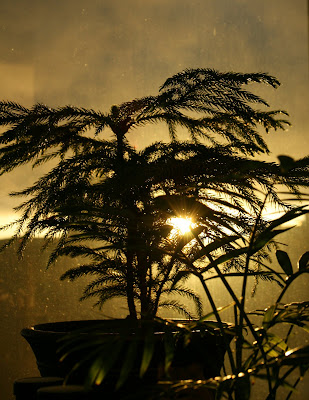
Here is another shot I took a few weeks back of the sunset through my desk foliage.
In the last couple weeks there has been an increasing number of eagles flying around and over the water. I have been able to get a couple shots of them flying over with my 75-200 telephoto lens on my Canon Rebel XTi.
Here is a shot of a Golden Eagle flying over the Edgewater Inn.
Here is another shot I took a few weeks back of the sunset through my desk foliage.
Wednesday, February 13, 2008
How to Take Better Sunset Photos

Here is a good article that was published on CNN about taking good sunset and sunrise photographs. (see article)
(Budget Travel) -- One of the most desirable travel images can be the trickiest to get right. Follow these step-by-step tips for capturing sunsets that will live up to the moment you remember.
Sunset at 12th Street and Sixth Ave. in New York City
While light is always an important factor in taking a photograph, with a sunset light is the factor. You want a richly saturated image, one that accurately captures the colors in front of you. Your job as the photographer is to let the camera know what to look at in order to record those colors properly.
The first step is to turn off your flash. Since your flash will often be triggered automatically in low light -- creating a blast of bright cold light -- turning it off will allow the warm natural light to dominate the picture. If you have to use the flash (some cameras will not allow you to turn the function off), opt for the "fill flash" or "night photo" setting to reduce the power of the flash. These settings can be found by cycling through your flash options, usually symbolized by a lightning bolt icon.
The second and more important preparatory step is to fill the camera frame with the sky. Point the center of the frame above the horizon line and fill the frame with the color and light you want captured. This is how you tell the camera's light meter what needs to be properly exposed.
Once you have filled the frame with sky, push the shutter button half way down to lock in the exposure and the focus; you can recompose the shot, if need be. As long as you keep the shutter button pressed halfway down, the exposure and focusing point will remain the same (for up to 30 seconds on most cameras). When you're ready, press the shutter all the way to take the picture. This technique works with all auto-focus cameras, both film and digital. A side effect of recomposing and setting the exposure value to very bright light is that objects like trees and buildings will lose some detail and be silhouetted.
Here are more tried-and-true bits of advice:
Be prepared: Take your camera with you! You never know when the perfect sunset will occur. And if you know you'll be out all day, pack an extra battery. You may also want to note the exact time of the sunset (check a local paper or a weather-oriented Web site). Arrive an hour beforehand to set up your shot. Once you're ready, begin photographing and keep shooting as the intensity of the light changes. Don't stop just because the sun goes down. The 10 to 15 minutes of diminishing light just after sunset can yield some of the best results.
Set your own film speed: Most modern cameras, film or digital, set the film speed (ASA/ISO) automatically. But checking it manually will ensure better results. Rather than use an ASA/ISO of 50 or 100 (good for bright daylight), use a faster speed like 400 or 800 ASA/ISO that is designed to be used at sunset and in other low-light conditions.
When it comes to resolution, aim high: If you're using a digital camera, choose the highest resolution your camera will allow, usually a "fine" or "super fine" JPEG (A JPEG is a standard, highly compressed image file). Access to these settings can usually be found by pressing the Menu or Function key on your camera. If your camera has a "raw" or "TIFF" mode, try it. These modes will compress the image less than a JPEG and will ultimately yield a bigger file and a richer image. While the files may take up more room on your memory card, the inconvenience will be worth it once you see the sunset prints, particularly if you enlarge the prints beyond five by seven inches.
Visualize in advance: Try to envision the picture before you even bring the camera to your eye. Then take a few extra seconds to perfect the image. Be sure that everything you want to capture is clearly in the frame and remove any extraneous or distracting objects from the composition. What qualifies? It's up to you to determine what seems distracting, but as a general rule, less is more with a sunset photo -- let nature put on its show.
Compose off center: Centering objects in the frame can make for a static composition. Try placing the sun to the left or right. Use objects such as trees or buildings to help frame the image and give it depth. If you are photographing near the water, you may want to incorporate it into the image to show the sunset's reflection on the surface. Clouds are another element that can add texture and pattern to the image.
Early riser? While these tips have been designed with the sunset in mind, they will also work very well for a sunrise. The key difference is that you won't be able to shoot into the sun at all because of its blinding early-morning intensity. Instead, keep the sun at your back and focus on the light as it falls in front of you.
Subscribe to:
Posts (Atom)